User Guide
This page covers running VTC on your audio and understanding the files it produces. The Technical Reference at the bottom collects the full list of command-line options, performance benchmarks, and other details for engineers.
Make sure you've completed the Getting Started page before continuing.
Run VTC
One command processes a whole folder of recordings. The basic form is below; see Command Line Interface Arguments at the bottom for everything else you can configure.
To run VTC, place your .wav files in a folder (let's call it audio_folder), then run this in a terminal, replacing the angle-bracketed paths with your own:
A helper script is also provided at scripts/run.sh so you don't have to retype the command. Open the file in a text editor and change the variables at the top:
audios_path: the path to the folder containing your.wavfiles (e.g.,audios_path="/home/user/my_project/audio").output: where you want the results saved (e.g.,output="/home/user/my_project/output").
Then run it:
Understanding the output
VTC writes one row per detected speech segment, in two equivalent formats. Use the CSV for analysis; the RTTM files exist mainly for compatibility with other speech-processing tools.
After VTC finishes, your output folder will look like this:
<output_folder>/
├── 📂 rttm/          # One .rttm file per audio recording
└── 📄 rttm.csv       # All detected segments combined into one CSV
Both formats contain the same information. For analysis, we recommend the CSV — it opens directly in Excel, Numbers, or LibreOffice, and loads cleanly into a dataframe in R or Python. The RTTM files exist because RTTM is a standard format used across speech-processing tools, so other software in the pipeline (such as ALICE) may expect it.
What's in each row
Every row of the CSV (and every line of an RTTM file) describes one detected segment of speech, with four pieces of information that matter for analysis:
| Field | Meaning |
|---|---|
uid |
The filename the segment came from. |
start_time_s |
When the segment starts, in seconds from the beginning of the recording. |
duration_s |
How long the segment lasts, in seconds. |
label |
The speaker category: KCHI, OCH, MAL, or FEM. |
Here is an example of a few segments from one recording, followed by an illustration of what those segments look like laid out on a timeline. VTC does not produce the picture itself — only the CSV/RTTM. The picture is just to help you visualise what the rows mean.
uid,              start_time_s, duration_s, label
recording_jd7aks,         0.12,       1.20,   FEM
recording_jd7aks,         3.30,       0.34,   MAL
recording_jd7aks,         3.98,       1.98,   FEM
recording_jd7aks,         5.86,       2.10,   MAL
recording_jd7aks,         6.10,       1.90,  KCHI
recording_jd7aks,         8.24,       0.52,   OCH
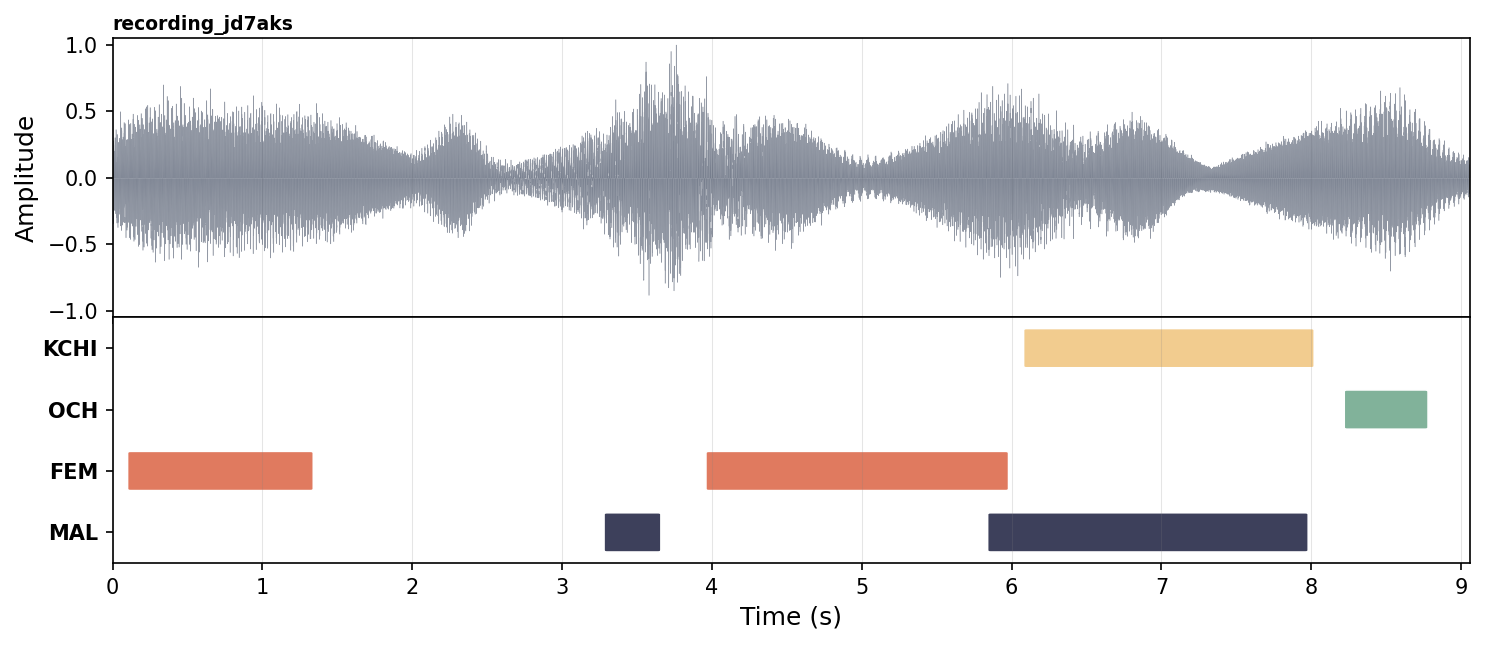
Notice that two segments can overlap in time (here, MAL and FEM between 5.86 s and 5.96 s, and MAL and KCHI between 6.10 s and 7.96 s). This is intentional: VTC labels each speaker category independently, so it can correctly mark moments where, for example, an adult is talking while the child is babbling at the same time.
RTTM format details
The 📂 rttm/ folder contains one RTTM file per audio file, one line per detected segment, in this layout:
The four useful fields are uid, start_time_s, duration_s, and label. The 1 and the <NA> placeholders are required by the RTTM specification but are not used by VTC.
How long will it take?
VTC runs much faster on a GPU than on a CPU. As a rough guide: a 1-hour recording takes a few seconds on a modern GPU and a few minutes on a CPU.
The table below shows measured processing times on a few representative machines. The "Real-time factor" column tells you how much faster than real time VTC runs — for example, a factor of 905× means that 1 hour of audio is processed in about 4 seconds.
| Setup | Real-time factor | 1 h of audio | 16 h of audio |
|---|---|---|---|
| H100 GPU, batch 256 | 905× | ~4 s | ~1 min |
| A40 GPU, batch 256 | 650× | ~6 s | ~1.5 min |
| CPU (Xeon Silver), batch 64 | 16× | ~4 min | ~1 h |
For large studies (hundreds of hours of recordings), a GPU is strongly recommended. If you don't have one available locally, your institution may have a shared compute cluster — see HPC / SLURM setup.
These numbers are approximate
Actual processing time depends on the specific hardware, audio length distribution, disk I/O speed, and the chosen batch size. Use the table as a rough planning guide, not a guarantee.
If VTC crashes with a "CUDA out of memory" error, lower the batch size and try again. The technical details of how to do that are in the Technical Reference below.
Technical Reference
This section is intended for engineers and power users. Non-technical readers can skip it.
Command Line Interface Arguments
Complete list of arguments accepted by scripts/infer.py.
Argument |
Default | Description |
|---|---|---|
--config |
VTC-2/model/config.yml |
Config file to be loaded and used for inference. |
--checkpoint |
VTC-2/model/best.ckpt |
Path to a pretrained model checkpoint. |
--wavs |
required | Folder containing the audio files to run inference on. |
--output |
required | Output path to the folder that will contain the final predictions. |
--uris |
— | Path to a file containing the list of URIs to use. |
--save_probs |
False |
Save the probabilities to disk. Can be memory intensive. |
--thresholds |
— | Path to a thresholds dict to perform predictions via thresholding. |
--min_duration_on_s |
0.1 |
Remove speech segments shorter than that many seconds. |
--min_duration_off_s |
0.1 |
Fill same-speaker gaps shorter than that many seconds. |
--batch_size |
128 |
Batch size for the forward pass of the model. |
--recursive_search |
False |
Recursively search for .wav files. May be slow. |
--device |
cuda |
Device to use. Choices: gpu, cuda, cpu, mps. |
--keep_raw |
False |
Keep raw RTTM and save to <output>/raw_rttm/. |
Example commands
Basic usage on CPU — process all .wav files in my_audio/ and save results to my_output/:
GPU with a smaller batch size — useful if your GPU has limited memory:
Search subfolders for audio files — if your .wav files are organized in subdirectories (e.g., one per participant):
uv run scripts/infer.py \
    --wavs my_audio/ \
    --output my_output/ \
    --device cuda \
    --recursive_search
Keep raw (unprocessed) output — save the pre-post-processing RTTM files for debugging or custom analysis. See Understanding raw RTTM model outputs:
Filter out very short segments — drop detected segments shorter than 0.2 s and merge same-speaker gaps shorter than 0.15 s:
uv run scripts/infer.py \
    --wavs my_audio/ \
    --output my_output/ \
    --device cuda \
    --min_duration_on_s 0.2 \
    --min_duration_off_s 0.15
Batch size and memory
Larger batch sizes give higher throughput but require more GPU memory. The default batch size is 128. Recommended starting points: 256 for an H100 or A100, 128 for an A40 or RTX 3090, 64 for an RTX 3060 / 12 GB cards, 32 or lower for CPU runs. Lower the batch size if you hit CUDA out of memory. Note: --batch_size controls the model forward-pass batch, not the number of files processed in parallel.