Creating a Dataset and publishing it to GIN
This page is here to help you create a new Dataset following the ChildProject structure using data that has not been organized this way yet.
Table of contents
- First time users
- I have done this before, get me back on track:
- 1. Preparing GIN repositories (5min)
- 2. Creating the base structure and datalad repository (10min)
- 3. Organizing raw data (2 hours)
- 4. Link everything : The new metadata (1 hour)
- 5. Import the annotations (2 hours)
First time users
Environment
This guide is intended mainly to help collaborators in the LSCP lab. If you are part of the LSCP, you should have access to the oberon server. You should do all of the dataset creation on the server directly. Oberon is running a linux system.
Throughout this page, you will need to have access to a terminal (for MacOS or linux) or a command prompt (for Windows). So open your ‘terminal’ or ‘cmd’ programm to enter text commands. To use oberon, log in using an ssh access (Use the credentials provided to you by the CoML team).
If you are a Windows user and are not using the oberon server, be aware that most of the software we use has been developped and tested for linux and MacOS systems. We expect it to run on Windows but no automated tests are performed. We will nor provide specific instructions for Windows systems. We recommend you use the windows subsystem for linux which will allow you to easily run a linux system embedded into your Windows.
ChildProject
You will need the ChildProject software. The default installation requires anaconda. It is available on oberon. If you are not sure you have conda installed, please do conda --version in your terminal. If you don’t have it, please refer to the instructions here.
Linux Users
# download the conda environment
wget https://raw.githubusercontent.com/LAAC-LSCP/ChildProject/master/env_linux.yml -O env.yml

# create the conda environment
conda env create -f env.yml

# activate the environment (this should be done systematically to use our package)
conda activate childproject
MacOS users
# download the conda environment
curl https://raw.githubusercontent.com/LAAC-LSCP/ChildProject/master/env_macos.yml -o env.yml

# create the conda environment
conda env create -f env.yml

# activate the environment (this should be done systematically to use our package)
conda activate childproject

# install git-annex from brew
brew install git-annex
Check the setup
You can now make sure the packages have been successfully installed:
child-project --version
Datalad procedures
To facilitate the dataset creation, we use templates that you need to install. First navigate your working folder (e.g. cd /store/scratch/<username> replace username with your actual username). Enter the following command lines to clone the repo and launch the installation :
cd /store/scratch/username #change the path to a working directory where we create a new folder for the installation

# copy the code into a new folder named datalad-procedures
git clone https://github.com/LAAC-LSCP/datalad-procedures.git

# go into the newly created folder
cd datalad-procedures

# install the required dependencies
pip install -r requirements.txt

# install the templates into datalad
python install.py
The command will produce a lot of output text. To check its success, we will list the available procedures:
# list available procedures
datalad run-procedure --discover
A list will be printed somewhat similar to :
cfg_laac1 (/my/conda/env/lib/python3.6/site-packages/datalad/resources/procedures/cfg_laac1.py) [python_script]
cfg_yoda (/my/conda/env/lib/python3.6/site-packages/datalad/resources/procedures/cfg_yoda.py) [python_script]
cfg_el1000 (/my/conda/env/lib/python3.6/site-packages/datalad/resources/procedures/cfg_el1000.py) [python_script]
cfg_text2git (/my/conda/env/lib/python3.6/site-packages/datalad/resources/procedures/cfg_text2git.py) [python_script]
cfg_metadatatypes (/my/conda/env/lib/python3.6/site-packages/datalad/resources/procedures/cfg_metadatatypes.py) [python_script]
cfg_laac2 (/my/conda/env/lib/python3.6/site-packages/datalad/resources/procedures/cfg_laac2.py) [python_script]
cfg_laac (/my/conda/env/lib/python3.6/site-packages/datalad/resources/procedures/cfg_laac.py) [python_script]
Look for the cfg_laac entry in the list, it is the one we want to use. You are good to go if it is there.
GIN account
We use GIN as an online platform for storing our repositories. To publish your dataset, you will need a GIN account that has writing permissions for your dataset. You should have created an account already, if not do it here. Once you have an account, ask Loann/Alex should give you writing permissions on a dataset within the LAAC-LSCP organization.
For every new computer that you will use to push updates to your dataset, You have to register an SSH key to allow SSH access (you can find an explanation of what SSH keys are and how you can create one in this tutorial). You only need to do this once per computer, and it’ll be set for all of your datasets & forever. To set SSH access, visit the settings of your user account. In the “SSH Keys” tab, click the button “Add Key”: 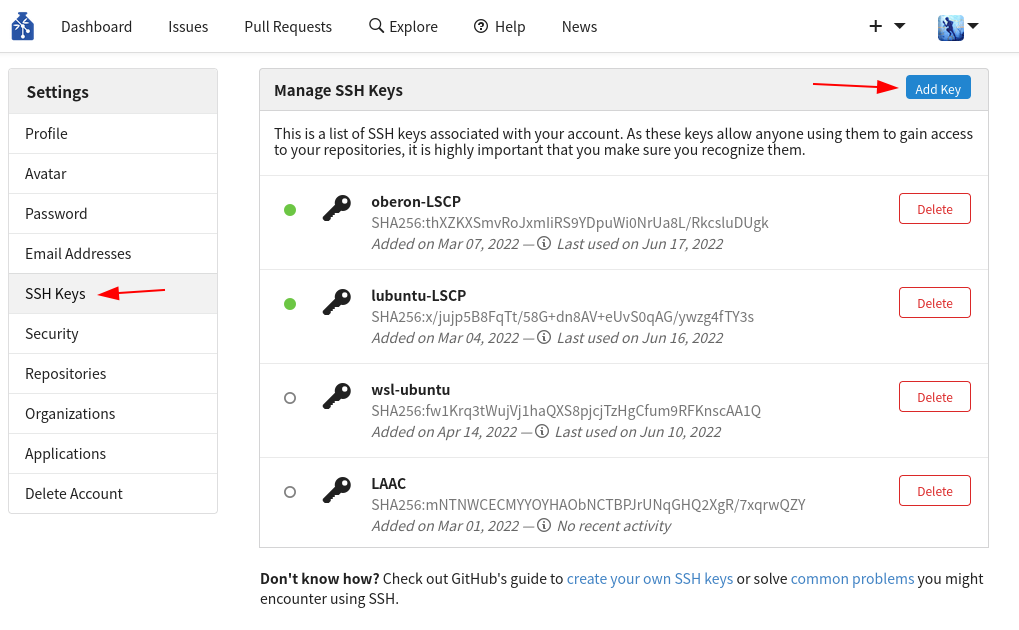
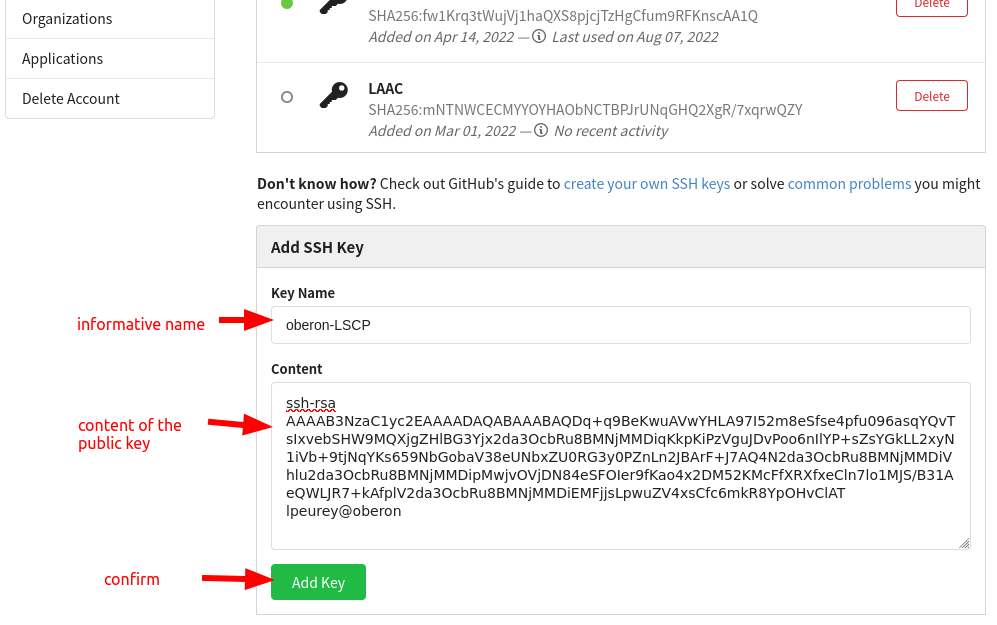
- In the “Key Name” field, give an informative name that will allow you to remember what computer it belongs to (eg “oberon-lscp”).
- In the “Content” field, copy the content of your public key. In oberon, and in most systems, the key is by default the file
~/.ssh/id_rsa.pub. You can print it with the commandcat ~/.ssh/id_rsa.pub, then copy all the output into the field.
Confirm the addition of the key.
I have done this before, get me back on track:
This section lists the checks you should carry out before using the guide, knowing that you went through it before and you should not need to install new programms or register to new websites. If it does not work out, go back to the relevant first use section.
Environment
You should connect to oberon. If you did set up your connection in the past following the CoML wiki, you should run:
ssh oberon
ssh foberon #if the first command failed
You should now be connected to oberon.
ChildProject
You will need to have childproject activated. If you installed it as instructed, run:
conda activate childproject
If the activate succeeded, the terminal should display (childproject) before your username and path, looking like:
(childproject) [lpeurey@oberon lpeurey]$
If the activation fails, make sure you did not install it elsewhere or with another name before going through the installation
For this specific guide, we need datalad to be at version 0.17.3 or more (due to a bug fix). So once your environment is activated, check your datalad version and upgrade it if necessary:
(childproject) [lpeurey@oberon lpeurey]$ datalad --version
datalad 0.15.4
(childproject) [lpeurey@oberon lpeurey]$ pip install -U datalad #upgrade because the version printed is not 0.17.3 or more
Datalad procedures
You must check the available procedures with:
# list available procedures
datalad run-procedure --discover
A list will be printed somewhat similar to :
cfg_laac1 (/my/conda/env/lib/python3.6/site-packages/datalad/resources/procedures/cfg_laac1.py) [python_script]
cfg_yoda (/my/conda/env/lib/python3.6/site-packages/datalad/resources/procedures/cfg_yoda.py) [python_script]
cfg_el1000 (/my/conda/env/lib/python3.6/site-packages/datalad/resources/procedures/cfg_el1000.py) [python_script]
cfg_text2git (/my/conda/env/lib/python3.6/site-packages/datalad/resources/procedures/cfg_text2git.py) [python_script]
cfg_metadatatypes (/my/conda/env/lib/python3.6/site-packages/datalad/resources/procedures/cfg_metadatatypes.py) [python_script]
cfg_laac2 (/my/conda/env/lib/python3.6/site-packages/datalad/resources/procedures/cfg_laac2.py) [python_script]
cfg_laac (/my/conda/env/lib/python3.6/site-packages/datalad/resources/procedures/cfg_laac.py) [python_script]
Look for the cfg_laac entry in the list, it is the one we want to use. You are good to go if it is there.
Otherwise, refer to the installation section.
GIN account
If you did that in the past, you should already have a GIN account. Sign in to your GIN account. You should check that the computer you are working from has a linked ssh key to GIN. Go to your account’s ssh settings and search in the list for the key associated to the machine you are working with (most likely oberon). If you can’t find it, you may need to add it.
1. Preparing GIN repositories (5min)
We are going to need a new repository on GIN where we will store our dataset and manage people’s access to it once it is ready to be shared. Inside the lab, we regroup our datasets in the LAAC-LSCP GIN organization, so the dataset should be created there. If you have the permissions necessary to create a new repository for the organization, follow the steps in the attached figure. If you are an intern, discuss with Alex/Loann of your need of a new repository. Unless your dataset is public (e.g. from CHILDES), you’ll need 3 levels of access:
- confidential => data that is never shared, usually personal information that is not useful anyway for analysis (e.g. names)
- collaborators => data that is shared with collaborators when we grant them access to the data, usually under NDA (e.g. recordings, transcriptions)
- public => data that can be accessed by anybody, completely anonymous so no audio, no transcription, no personal metadata (e.g. converted automated annotations).
If you are the one creating the repos (most likely Loann will have to create them for you), use the creating a repo page 3 times in your GIN organization and create the empty reposotories named:
<dataset-name>(e.g.mydataset)<dataset-name>-public(e.g.mydataset-public)<dataset-name>-confidential(e.g.mydataset-confidential)
If your dataset is public, you will create a single repository that will be public. 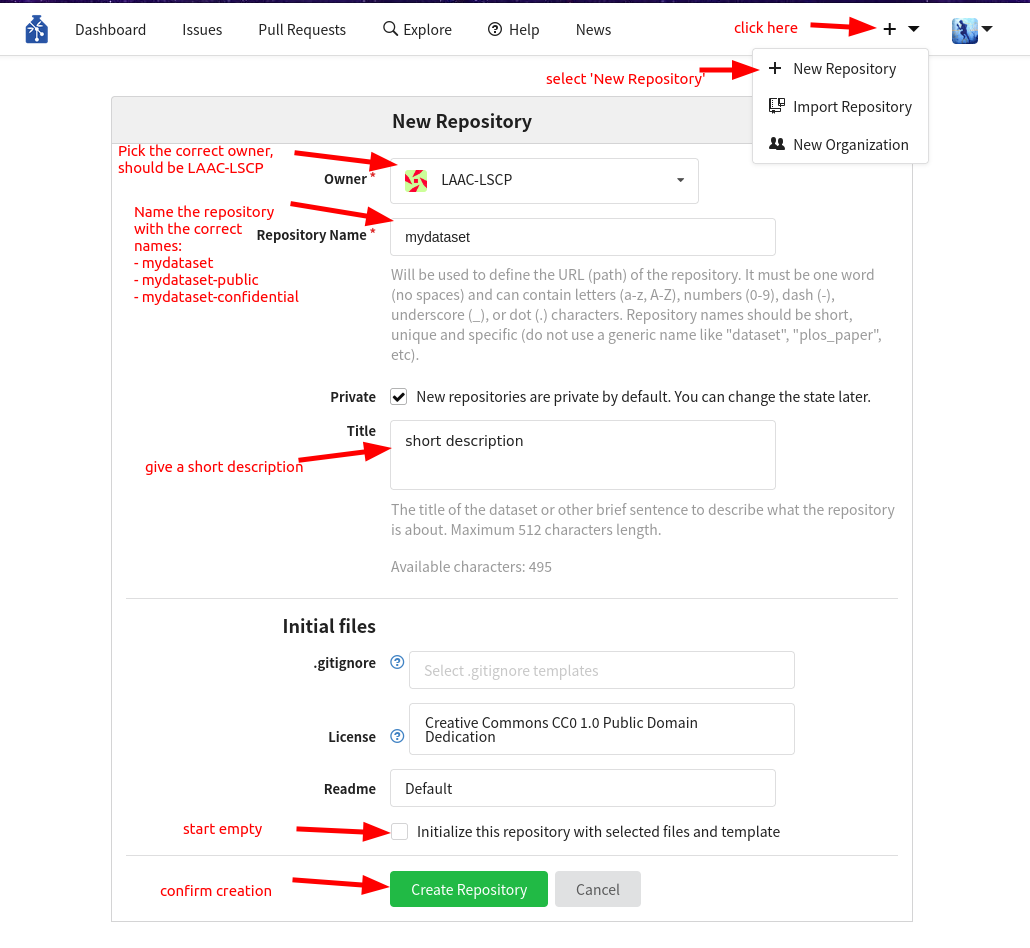
2. Creating the base structure and datalad repository (10min)
Here we will only use the laac template which is the one we will use most of the time. If you want, you can read more about that configuration and the other templates available in the repo.
The next list of commands must be run to set the parameters
export GIN_ORGANIZATION='LAAC-LSCP' # name of the GIN organization
export CONFIDENTIAL_DATASET=1 # set to 0 if there should not be a confidential repository
export PUBLIC_DATASET=1 # set to 0 if there should not be a public repository
Now we can create the actual datalad repository, the procedure used will build the file structure according to ChildProject standards. First change directory to where you want your new dataset created, then create it. Replace mydataset by the name of your GIN repository.
cd /path/to/a/folder #change directory
datalad create -c laac mydataset
The output you get will resemble this (but can have some differences):
[INFO   ] Creating a new annex repo at /store/scratch/lpeurey/datasets/mydataset/
[INFO   ] Scanning for unlocked files (this may take some time)
[INFO   ] Running procedure cfg_el1000
[INFO   ] == Command start (output follows) =====
[INFO   ] Could not enable annex remote origin. This is expected if origin is a pure Git remote, or happens if it is not accessible.
[WARNING] Could not detect whether origin carries an annex. If origin is a pure Git remote, this is expected.
.: origin(-) [git@gin.g-node.org:/LAAC-LSCP/mydataset.git (git)]
.: origin(+) [git@gin.g-node.org:/LAAC-LSCP/mydataset.git (git)]
[INFO   ] Could not enable annex remote confidential. This is expected if confidential is a pure Git remote, or happens if it is not accessible.
[WARNING] Could not detect whether confidential carries an annex. If confidential is a pure Git remote, this is expected.
.: confidential(-) [git@gin.g-node.org:/LAAC-LSCP/mydataset-confidential.git (git)]
.: confidential(+) [git@gin.g-node.org:/LAAC-LSCP/mydataset-confidential.git (git)]
[INFO   ] Configure additional publication dependency on "confidential"
.: origin(+) [git@gin.g-node.org:/LAAC-LSCP/mydataset.git (git)]
[INFO   ] Could not enable annex remote public. This is expected if public is a pure Git remote, or happens if it is not accessible.
[WARNING] Could not detect whether public carries an annex. If public is a pure Git remote, this is expected.
.: public(-) [git@gin.g-node.org:/LAAC-LSCP/mydataset-public.git (git)]
.: public(+) [git@gin.g-node.org:/LAAC-LSCP/mydataset-public.git (git)]
[INFO   ] Configure additional publication dependency on "public"
.: origin(+) [git@gin.g-node.org:/LAAC-LSCP/mydataset.git (git)]
[INFO   ] == Command exit (modification check follows) =====
create(ok): /store/scratch/lpeurey/datasets/mydataset/ (dataset)
The procedure should also carry out the first push to your remote repository(/ies). You should have a look to the online page of your repo on GIN (eg https://gin.g-node.org/LAAC-LSCP/mydataset-confidential) 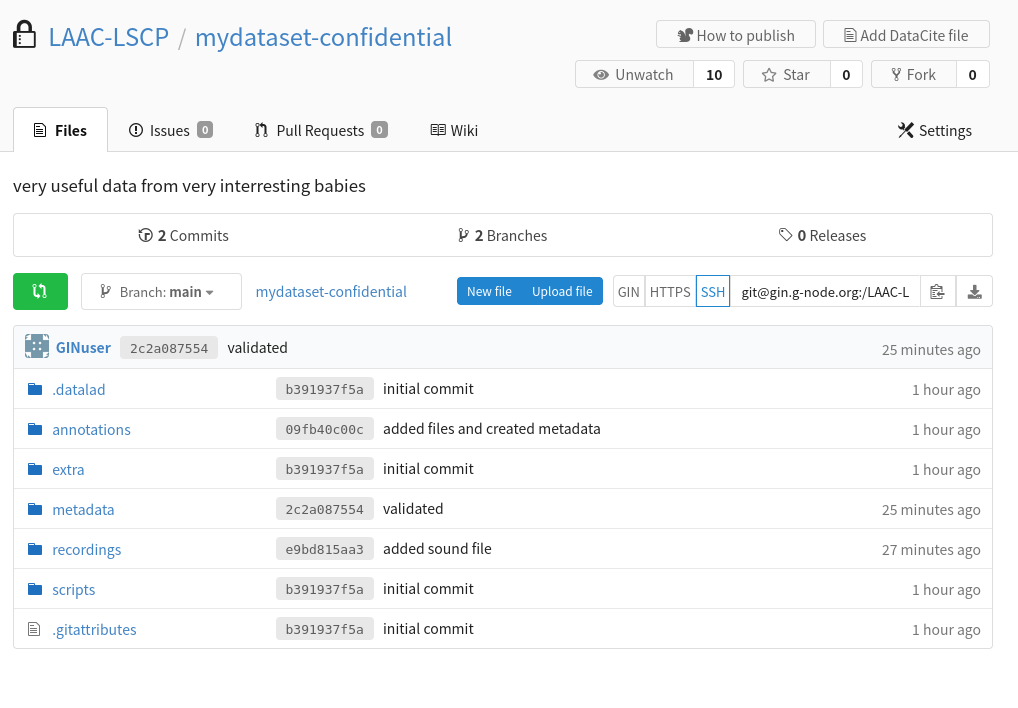
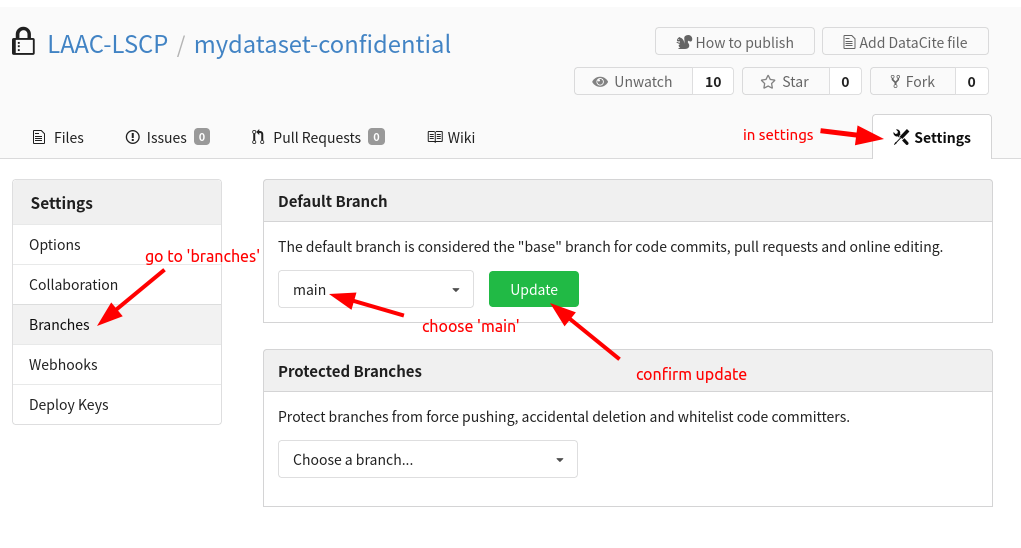
The online content does not have the same structure and folders?
Your default branch may be set to ‘git-annex’, change this in the settings for all the GIN datasets: 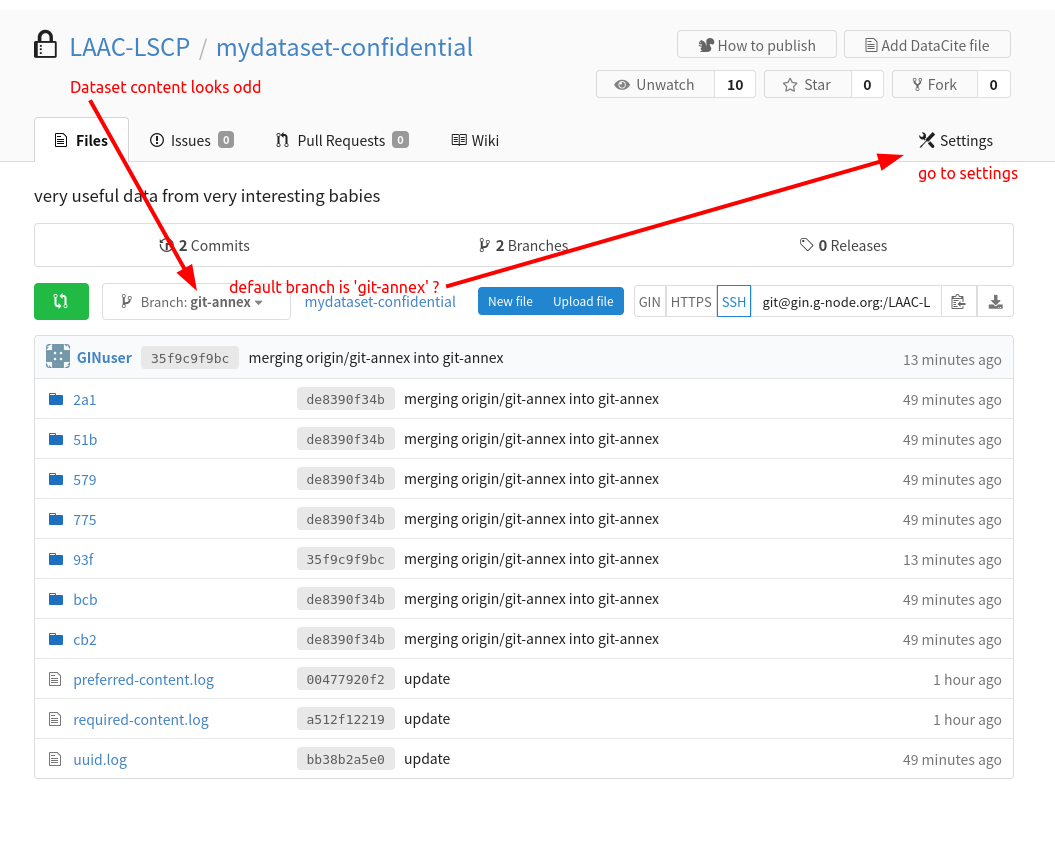
Congratulations, you just created a structured and ready to be uses repository for your dataset !! Your next step is to populate it with your data.
3. Organizing raw data (2 hours)
go into your new dataset : cd mydataset
Your dataset has been created, configured and linked to GIN. But for now, it has no contents. The next step is thus to add raw data to the dataset in the right place.
There are two possibilites (depending on whether you created a confidential repository or not):
- Some data are confidential and should only be accessible from
<your-dataset>-confidential - All data can be included in the main version of the dataset
As a reminder, the childproject structure is organized around the following structure:
   project
   │
   └───metadata
   │   │   children.csv
   │   │   recordings.csv
   │   │   annotations.csv
   |
   └───recordings
   │   └───raw
   │   │   │   recording1.wav
   │
   └───annotations
   │   └───vtc
   │   │   └───raw
   │   │   │   │   child1.rttm
   │   └───annotator1
   │   │   └───raw
   │   │   │   │   child1_3600.TextGrid
   │
   └───scripts (*)
   │   │   import-vtc.py
   │
   └───extra
       │   notes.txt
- the
recordingsfolder is dedicated to storing the audio files of the dataset - the
metadatakeeps any kinf of metadata, more specifically the list of recordings and information about them, the list of children and their information and finally, the list of annotations file and what they are linked to. Any other kinf of metadata can also be stored here. - the
annotationsfolder contains what we call sets. Sets are folders grouping together multiple annotation files (usually by type and annotator). For example, we usually have avtcset containing all the annotations given by the voice-type-claddifier and a human annotation set produced by an annotation campaign (e.g.eaf2022). - the
scriptsfolder contains scripts that were used in the dataset (it is optional to have this folder) - the
extrafolder contains any other additional file useful in the dataset. That could be csv files storing a list of audio segments selected by the sampler pipeline for example
How confidential data is organized and stored
Here is the rule: every file that is a descendant of a confidential folder will be restricted to users that have read access to <your-dataset>-confidential; any other file will be shared with all users who have read access to your dataset.
Here are a few examples:
Files that would be confidential
metadata/confidential/whatever.csvannotations/its/confidential/raw/something.itsannotations/its/confidential/converted/something.csvannotations/eaf/confidential/raw/some/annotation.eaf
Files that will not be
metadata/somefile.csvannotations/its/raw/something.csv
It is therefore crucial to organize your data in the right place depending on its level of sensitivity.
What is considered public data
By default, we only consider automated converted annotation files to be public. We assume they are stored in the standard set we use:
- vtc
- vcm
- its
- alice
- alice/output
Files that would be public
annotations/its/converted/something.csvannotations/its/converted/subfolder/something.csvannotations/vtc/converted/something.csvannotations/alice/output/converted/annotation.csv
Files that will not be
annotations/its/raw/something.csvannotations/cha/converted/something.csvrecordings/raw/rec1.wavannotations/alice/output/converted/confidential/annotation.csv
Audio files
Original recordings
Your original audio files should always be stored under recordings/raw. Copy your audio files in this folder. That way, you keep all originals before any conversion.
You will likely want derived versions of them, depending on the format, codec, sampling rate, number of channels used for those files. We use wav files sampled at 16kHz mono channel with codec pcm_s16le as our standard. This is to make sure we can apply our usual models to them and read their content correctly. You are strongly encouraged to do that conversion using childproject once you have finished creating the dataset as the automatic conversion relies on the dataset already being organized and passing the childproject validation.
Splitting LENA recordings
the LENA software outputs audio files that can sometimes contain multiple sessions. This means that in a single audio file, you will find that the recording is sometimes stopped and restarted at a different hour. ChildProject is built on the assumption that every audio file is a single continuous recording with a single starting time. If you have lena audios that contain multiple sessions, you will have to split them into different files. This should be done directly in recordings/raw and before any audio conversion because that will change the number of audio files and subsequently the recordings index in metadata/recordings.csv which needs to be unique. You can however store the original lena files in a different folder such as recordings/lena_output for the sole purpose of keeping your original data.
If you already moved your audio files into recordings/raw, you should now rename the raw folder to lena_output (use mv recordings/raw recordings/lena_output for example). Then we recommand running our scripts:
- copy the 2 script files into your
scriptsfolder : - run the commands to first create the recording index and then split the recordings. Run it from the base folder of the dataset (e.g.
/store/scratch/lpeurey/mydataset):python scripts/lena_create_rec_metadata.py # you should now have the file metadata/recordings.csv in the dataset python scripts/split_lena_recordings # you should now have the split recordings in recordings/raw
Saving and publishing audio files
After preparing correctly your audio files, it is time to save your changes again with
datalad save -m 'audio data'
However be cautious with pushing your changes online because the audio data can be extremely large and the uploading really long. If you have access to a cluster/server running continually, consider doing the upload from there with a job, allowing you to log out while the upload continues. Otherwise, you can choose to run the push bits by bits by running the command datalad push recordings/raw/rec1.wav on your different audio files one by one.
Original Metadata
The original metadata is likely to contain sensitive information, so if you have a confidential dataset, it should be restricted to the confidential version of the dataset. Therefore, most of the time, your original metadata should lie in metadata/confidential/original. Otherwise, store it in metadata/original.
# cd to your dataset
cd <your-dataset>

# create an empty folder for the original metadata
mkdir -p metadata/confidential/original
LENA annotations
.its annotations contain information that may be used to identify the participants (such as their date of birth). So you should consider storing them as confidential.
# create an empty folder for the .its
mkdir -p annotations/its/confidential/raw
Your .its files should be saved in the folder annotations/its/confidential/raw or annotations/its/raw depending on if they are to be kept confidential or not.
If you stored them as confidentiel, an anonymized version of the .its should be created. This is done with the ChildProject package:
child-project anonymize . --input-set its/confidential --output-set its
This may take some time. Once the command has completed, anonymized .its files should be accessible from annotations/its/raw:
ls annotations/its/raw
123417-0008.its	123461-0713.its	123505-1620.its	123549-2417.its ...
Other data
- VTC annotations (.rttm files) should be moved to
annotations/vtc/raw - VCM annotations (.rttm files) should be moved to
annotations/vcm/raw - ALICE annotations (.txt files) should be moved to
annotations/alice/output/raw - Any other kind of annotation should be moved to
annotations/<set>/raw/e.g.annotations/cha/raw/for cha files,annotations/eaf/CD/raw/for eaf annotated by an annotator identified by the ‘CD’ tag. - Other files (documentation, etc.) should be moved to
extra/
You can create empty folders with mkdir -p, e.g. mkdir -p annotations/vtc/raw.
Save and publish
Once all your raw data have been correctly placed in the new dataset, you need to save the changes and publish them on GIN :
# save the changes locally
datalad save . -m "message about what changes were made"

# publish
datalad push
4. Link everything : The new metadata (1 hour)
We now need to create the metadata files that childproject uses to link all the files together. For an overview of the files needed and their format, head to ChildProject format
After the creation is finished, don’t forget to save and push your changes.
datalad save . -m "message about what changes were made"
datalad push
Create the metadata from the its information
One common way to create the metadata is to extract it from the its files you have. This was done in many cases and the EL1000 package was created to help in this process. You can install the package or just copy the metadata.py script. You should use the MetadataImporter class to process the files and create you metadata. Be aware that each dataset will need some degree of adaptation in the code. We recommend that you copy an example from a dataset which original data look like yours, and save it to scripts/metadata.py. Then you can make all necessary changes before running it. An example can be found in this section
Warning
If your lena audio files contain multiple recordings, the metadata importation will create one line for each ‘session’ even if they are contained in a single audio file. Once metadata/recordings.csv is created, it should contain the columns its_filename and duration necessary to correctly split the recordings. You should now run the script to split the recordings.
Example of manual creation
If you can’t extract the metadata from .its files, you should find another way of creating the metadata. You should prioritize methods that rely on a script that is saved in your dataset to make sure you keep a trace of where the metadata came from and maybe in the future use a similar script for another dataset. You can have a look at this pratical example. Even though this example is using information found in .its files, it can give you an idea of the steps involved and the way to procede.
Dataset validation
To verify the content and organization of your dataset, use the childproject validation command:
cd path/to/mydataset
child-project validate .
Read through the output to see if the validation was successful. If not, fix the errors and re-run the validation until it passes.
5. Import the annotations (2 hours)
General aspects
Once again, like for creating metadata, the importation process can vary significantly depending on the annotations available to you and their format. For the initial creation of the dataset, it can often be easier to include the raw annotations in your dataset and worry about importing them at a later stage.
When ready to procede, use the child-project import annotations command or API call. Information necessary is listed below
| Name | Description | Required? | Format |
|---|---|---|---|
| set | name of the annotation set (e.g. VTC, annotator1, etc.) | required | |
| recording_filename | recording filename as specified in the recordings index | required | |
| time_seek | shift between the timestamps in the raw input annotations and the actual corresponding timestamps in the recordings (in milliseconds) | required | (-?)([0-9]+) |
| range_onset | covered range onset timestamp in milliseconds (since the start of the recording) | required | [0-9]+ |
| range_offset | covered range offset timestamp in milliseconds (since the start of the recording) | required | [0-9]+ |
| raw_filename | annotation input filename location, relative to annotations/ | required | True |
| format | input annotation format | optional | csv, vtc_rttm, vcm_rttm, alice, its, TextGrid, eaf, cha, NA |
| filter | source file to target. this field is dedicated to rttm and ALICE annotations that may combine annotations from several recordings into one same text file. | optional |
Specific formats
We don’t provide specific instructions for each format because even with the same format, the way to procede and the annotation content can have a lot of variety. In this section you will find indications on what aspects and parameters you should be cautious when importing.
LENA its
Importing LENA its files is usually straight forward because they cover the whole files and the information they contain is consistent. The only particularity is when you happen to have recordings that were split (see above). In this case, the timestamps need to be shifted by the duration of previous audios extracted from the same lena file. This shift is used as your negative
Example: We have the following metadata/recordings.csv file generated using information from the its files.
| recording_filename | duration | date_iso | start_time | session_id | child_id | its_filename | recording_device_type | experiment |
|---|---|---|---|---|---|---|---|---|
| e20051112_123456_654321_1.wav | 21472350 | 2005-11-12 | 07:10 | e20051112_123456_654321_1 | AA | e20051112_123456_654321.its | lena | test |
| e20051112_123456_654321_2.wav | 15671570 | 2005-11-12 | 16:43 | e20051112_123456_654321_1 | AA | e20051112_123456_654321.its | lena | test |
| e20051112_123456_654321_3.wav | 6187130 | 2005-11-13 | 10:57 | e20051112_123456_654321_2 | AA | e20051112_123456_654321.its | lena | test |
You can see that those 3 files are linked to the same its file, so they were extracted from a single original lena audio file. To import the its annotations, we will need to shift the timestamps to have the following importation table:
| set | recording_filename | time_seek | range_onset | range_offset | raw_filename | format |
|---|---|---|---|---|---|---|
| its | e20051112_123456_654321_1.wav | 0 | 0 | 21472350 | e20051112_123456_654321.its | its |
| its | e20051112_123456_654321_2.wav | -21472350 | 0 | 15671570 | e20051112_123456_654321.its | its |
| its | e20051112_123456_654321_3.wav | -37143920 | 0 | 6187130 | e20051112_123456_654321.its | its |
This can be achieved by a simple script like this one who does the data preparation and then runs the importation:
"""
This script uses metadata/recordings.csv to import its annotations. It assumes recordings.csv contains columns 'its_filename' and 'duration' to run the importation
"""
import pandas as pd
from ChildProject.projects import ChildProject
from ChildProject.annotations import AnnotationManager

dataset_path = "."

#load the project and annotation manager
project = ChildProject(dataset_path)
am = AnnotationManager(project)

# we take a copy of the recordings.csv file of the dataset, that suits us because we have one importation per recording, as is usually the case with automated annotations
input_frame = pd.DataFrame.copy(project.recordings)
input_frame = input_frame.sort_values(['its_filename', 'recording_filename'])

#make sure that the duration for the recordings is set in recordings.csv, it should be imported with the metadata of the its
input_frame["raw_filename"]= input_frame['its_filename']
input_frame["set"] = 'its'
input_frame["range_onset"] = "0" #from the start of the audio...
input_frame["range_offset"]= input_frame["duration"] # ...to the end

for its, df in input_frame.groupby('its_filename'):
    input_frame.loc[df.index,'time_seek'] = - df['duration'].cumsum().shift(1, fill_value = 0)

am.import_annotations(input_frame)
Automated : VTC, ALICE, VCM
Those models are almost always run on the entire files and are quite easy to import. You should check out our guide for running and importing automated annotations here
Human : cha, TextGrid, eaf
Human annotations are treaky to handle because they have a lot of variety in what is annotated and how. It is not unsual to encounter oddities and errors in them which can result in a difficult importation process.
As for every other importation, you will need to build a dataframe that has the required info. For human annotations, you will often have multiple short annotation segments to import for each audio (e.g. 8 segments of 5min per audio file). So you should generate this importation dataframe (and keep track somewhere of how this was generated) and launch the importation.
If the importation fails, try to identify what part of the conversion is causing issues. You can try using a script parsing the files to find where they may have errors.
If the importation went through always check the resulting converted files to make sur all the information got correctly imported (e.g. the importation has taken all annotated segments and speaker type but omitted transcriptions).
After going through those steps, if you did not manage to get the set imported correctly, either because of errors encountered or because some information is not properly imported, you can turn to custom importation. Custom importation allows you to define your file converter yourself, defining how the original file should be handled and what information inside should be kept and stored into the resulting annotations. Head to this page.
Save and push
Once again, after carrying out changes to the dataset, we need to save its current state and push modifications online
# save the changes locally
datalad save . -m "message about what changes were made"

# publish
datalad push